Elo OEMConfig Configurations
OEMConfig is an Android Enterprise standard that enables OEMs to make new features and configurations immediately available to customers. Available on the Google Play store, the Elo OEMConfig app provides a single interface for Android Enterprise Certified EMM and MDM tools to enable customers to manage updates and configuration changes to Elo Android devices after they are deployed in the field.
System Requirements
- Work managed Elo device(s) running Android 10+.
- A UEM or EMM system supports OEMConfig-compliant admin tools.
Installation
- Contact Elo Solution Architect or Support team for documentation on setting up and installing the OEMConfig application on to your device.
Configuration changes
- The application starts at boot. It can also be triggered manually or by sending an application launch script from a UEM portal.
- The UI will indicate that it is checking device configuration settings.
- Configuration changes can be pushed from the MDM portal and should be triggered when received by the device.
It is recommended, not required, to reboot (soft reset) the device when a new configuration(s) is added.
Major updates
-
To update application launch script, the “class” parameter included in the syntax needs to be updated from:
class=com.elotouch.oemconfig. view. EloOEMConfigActivity
to:
class=com.elotouch.oemconfig. view. EloConfigActivity
When the production environment contains multiple versions of the Elo OEMConfig, a device reboot action, instead of application launch script, can be used to trigger application launch.
Application Configurations
1. Elo OTA (over the air) Download:
Use this configuration to download and install any latest available OS (Operating Systems) update. Subscription to OS360 is required.
This setting cannot be configured alongside other settings.
| Option | Description |
|---|---|
| Auto |
Device to check the latest available build version and proceed with system update automatically. |
| Manual |
User to provide specific OTA package URL for device upgrade.
|
When OTA is in progress, 2 types of toast messages would appear on the device screen. Both messages provide percentage indication.
-
OTA download

-
OTA finalizing

2. Date and Time
-
Time zone: Use this configuration to update the time zone on the device (UTC offsets are positive east of UTC and negative west of UTC).
- Select an Olson/tz Time Zone identifier (i.e. "America/New_York") or Etc/GMT time from the drop-down menu. When left empty, device default time zone setting will be retained.
-
NTP setup: Use this configuration to override Android default NTP configuration. Device will and is required to be rebooted to apply changes.
-
NTP Server URL.
- Enter NTP server address.
-
NTP Sync Interval.
- Enter the number of minutes between each NTP sync attempt. The minimum value should be set to 15 (minutes)
-
NTP Server URL.
-
Display 24-hour Time: Show time in 24-hour form, as opposed to locale default form.
Option Description Enable Default setting. Disable Use the device default format.
3. Network
-
Network Configuration List: Use the fields under this setting to configure the network.
Item Option Descriptions Active Yes Network will be processed for configuration. No Network will be ignored for configuration. Type Wi-Fi For Wi-Fi configuration. Lan For Ethernet configuration Name Wi-Fi network name or SSID. Security Type WPA2 WPA WEP Open SSID Password Access point password. Blank for Lan. Static IP IP for static configuration (in dot notation). Blank for DHCP. Network Prefix 0-32 Blank for DHCP. Gateway Blank for DHCP. DNS1 Blank for DHCP. DNS2 Blank for DHCP. SSID Proxy Host IP or URL for proxy server configuration. Blank for no proxy SSID Proxy Port 1-65535 Port number for proxy server configuration. Blank for no proxy. SSID Priority 1-6 Higher the number, higher the priority. For single entry, use 6. Open Network Notification Yes Enable open network notification. No Disable open network notification. Proxy Exclusion List URL or IP to bypass from proxy server. Avoid Poor Wi‑Fi Yes No -
Wi-Fi DFS: Enable or disable Wi-Fi Dynamic Frequency Selections (DFS). DFS changes should be configured and applied separately from configuration changes.
Option Description Enable Allow WLAN to coexist with radar system. Disable Dynamic Frequency Selection function is disabled. -
Ethernet: Use this configuration to enable or disable Ethernet.
Option Description Enable Default setting. Disable Ethernet is disabled. -
Bluetooth: Use this configuration to enable or disable Bluetooth.
Option Description Enable Default setting. Disable Bluetooth is disabled. - Wi-Fi: Use this configuration to enable or disable Wi-Fi. Wi-Fi can only be turned off if there is an Ethernet connection present for the device.
- Bluetooth Scanning: Use this configuration to enable or disable Bluetooth.
Option Description Enable Default setting. Bluetooth scanning is enabled Disable Bluetooth scanning is disabled. - Wi-Fi Scanning: Use this configuration to enable or disable Wi-Fi scanning (background discovery used by the OS and apps).
Option Description Enable Default setting. Wi-Fi scanning is enabled Disable Wi-Fi scanning is disabled. - 802.1X (Enterprise Wi-Fi): Use this configuration to enable secure 802.1x authentication over LAN with EST certificate provisioning.
Parameters - Ethernet Enterprise Network Configurations: Use this configuration to define Ethernet enterprise network parameters for 802.1X authentication. These settings specify the certificate aliases and optional server identity required for secure Ethernet connections.
- Notes:
- Ensure that both CA and User certificates are installed on the device before applying these configurations
- This configuration is used in conjunction with 802.1X (EAP-TLS) authentication.
- For EST-based certificate management, refer to the EST Certificate Configurations section.
| Parameter | Description |
|---|---|
| Alias | Name to identify the certificate on the device. |
| EST URL | The URL of the EST server. |
| Port | Port number used to connect to the EST server. |
| Username | Username for EST server authentication. |
| Password | Password for EST server authentication. |
| Encoded EST Certificate Data | Paste the CA certificate in raw string format. Certificates must be converted before upload. |
| Parameter | Description |
|---|---|
| CA Certificate Alias | Enter the CA certificate alias installed on the device. The alias name must match the installed certificate exactly. |
| User Certificate Alias | Enter the User certificate alias installed on the device. The alias name must match the installed certificate exactly. |
| Server Identity (Optional) | Enter the server identity for the authentication server, if required by your network configuration. |
4. Display
-
Display On: Use this configuration to turn on/off display.
Option Description Enable Display stays awake. Disable Display stays off. -
Auto Idle mode: Use this configuration to turn on/off backlight after a specified time.
Option Description Enable Backlight will turn off between 12am-6am local time automatically. Disable Default setting. Backlight will not turn off. -
Screen Density (DPI): Use this configuration to change the screen density of your device. This setting cannot be configured alongside other settings.
Option Description 240 Default setting. Set screen density to 240 MDPI. 160 Set screen density to 160 MDPI. 320 Set screen density to 320 HDPI. 480 Set screen density to 480 HDPI. 480 Set screen density to 480 HDPI. -
Screen Orientation: Use this configuration to set the Screen Orientation.
- Use Portrait, Landscape, Landscape reverse (upside-down), or Portrait reverse (upside-down) mode to set the preferred screen orientation.
-
Screen Timeout: Use this configuration to set screen timeout.
Option Description Never Screen stays awake 15 Seconds Backlight turns off after 15 seconds; after 1 minute of inactivity. 30 Seconds Backlight turns off after 30 seconds; after 1 minute of inactivity. 1 minute Backlight turns off after 1 minute; after 1 minute of inactivity. 2 minutes Backlight turns off after 2 minutes; after 1 minute of inactivity. 5 minutes Backlight turns off after 5 minutes; after 1 minute of inactivity. 10 minutes Backlight turns off after 10 minutes; after 1 minute of inactivity. 30 minutes Backlight turns off after 30 minutes; after 1 minute of inactivity. -
Display Brightness: Set screen Brightness.
- Enter a value between 0 and 100.
-
Display Timer: Use this configuration to set the time when the display turns on and off. The display will remain on between the selected On and Off times.
Option Description Display Timer On Set the time for the display to turn on. Display Timer Off Set the time for the display to turn off. -
Font size: Use this configuration to set the font size.
- Use Default, Small, Large or Largest values to set preferred font size.
- For 5.0 devices, Extra-Large, XX-Large and Maximum sizes are also available.
The font size setting may not apply to some applications.
-
Smallest Display Width:
- Enter an integer value equal to or higher than 320dp.
Combining Smallest Width with Screen Density may produce unexpected behavior. An extremely high smallest width value on a small screen size may render the device unusable until new configurations are set.
- Enter an integer value equal to or higher than 320dp.
-
Display Size: Use this configuration to set the screen size.
- This setting adjusts the overall size of items on the screen. Use Small, Default, Large, Larger, Largest values to set the preferred display size.
This setting should not be mixed with specifying DPI or Smallest Width directly as it may cause unexpected behaviors.
- This setting adjusts the overall size of items on the screen. Use Small, Default, Large, Larger, Largest values to set the preferred display size.
-
Touch Through Mode: Use this configuration to enable/disable Touch Through mode for I-Series.
Option Description Enable Default setting. Touch function will persist with a glass overlay (up to 6mm) or glove touch (2-touch). Disable Touch function will not persist with a glass overlay (up to 6mm) or glove touch (2-touch).
5. Volume
-
Volume Level: Use this to set the media volume.
- Enter a value between 0 and 100.
-
Touch Sound: Use this configuration to enable and disable the touch sound.
Option Description Enable Default Setting. Touch sound will be played when a button on the screen is pressed. Disable No sounds will be played when any button the screen is pressed. -
Long-Term Safe Media: This feature automatically reduces output volume after 20 hours to protect your ears. Safe Media is enabled by default.
Option Description Enable Default Setting. Long Term Safe Media will be enabled. Disable Long Term Safe Media will be turned off.
6. Hardware Management
-
Power button: Enable/disable Power button.
Option Description Enable Default setting. - Display will be turn off when pressing Power button.
- Power options panel will appear when pressing and holding Power button.
Disable No action performed when pressing and pressing/holding Power button. -
Home button: Enable/disable Home button.
Option Description Enable Default setting. Device goes to Android desktop screen when pressing Home button. Disable No action performed when pressing Home button. -
Right trigger button: Enable/disable Right trigger button of Elo Handheld device.
Option Description Enable Default setting. Handheld device will trigger barcode scanner when pressing Right key. Disable No action is performed when pressing the Right trigger button key. -
Left trigger button: Enable/disable Left trigger button of Elo Handheld device.
Option Description Enable Default setting. Handheld device will trigger barcode scanner when pressing Left key. Disable No action is performed when pressing the Left trigger button key. -
Device Wakeup Key: Set one of the keys below to wake up the device from idle state.
Option Left Button Left Button + Right Button Left Button + Touch Left Button + Right Button + Touch Right Button Right Button + Touch Touch -
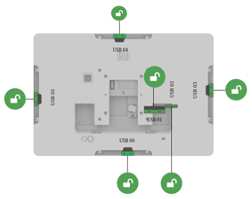
USB Ports Settings: Enable and disable a given USB port. Compatible with I-Series and Backpack 4.0 only.
-
For I-Series 4.0, below image indicates the type and location of each USB port on the device:
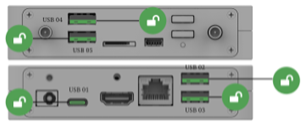
- For Backpack 4.0, below image indicates the type and location of each USB port on the device:
-
Options can be selected from the drop-down menu.
Option Description Enable USB port would function normally. Disable No data transfer nor power is available through USB port.
-
For I-Series 4.0, below image indicates the type and location of each USB port on the device:
-
LED Status Light Kit: Enable or disable LED Status Light Kit.
Option Description Enable Default setting. Turn on LED Status Light Kit remotely. Disable Turn off LED Status Light Kit remotely. -
Key Remap: Use this configuration to remap the left and/or right trigger keys. Compatible with Handheld only. Contact Elo support for the configuration offered for key remapping.
- Remap Left Trigger Key
- Remap Right Trigger Key
-
USB Power Deliver Mode: Set USB-C port power delivery. USB setting in Settings > Developer options need to be set to USB 2.0 +4lane DP.
Option Description Low 7.5 W available. High 27 W available - 90W power brick is connected. not standard.
- I-Series 15” or 22” Performance only.
- External monitor up 15”.
-
USB and Display Port Configuration: Set the USB specification to for the desired data transfer rates.
Option Description DP & HS-USB Type-C USB port can work DP and USB 2.0 together. SS-USB only Type-C USB port work with only USB 3.0 -
Barcode Scanner Management: Enable/disable Barcode Scanner.
Option Description Enable Default setting. Handheld device will trigger barcode scanner when pressing the Right or Left Key. Disable No action is performed when pressing the Right or Left key. - WebView Hardware Access: Enable or Disable WebView’s ability to access hardware components. Enabling this will allow customer applications using Elo Peripheral Connect to seamlessly interact with peripherals and integrated barcode scanners.
7. Input
-
Virtual Keyboard: Use this configuration to enable and disable the screen keyboard.
Option Description Enable Default setting. Virtual Keyboard will be displayed when data entry is in progress regardless of whether the device has an Active Physical Keyboard. Disable Virtual Keyboard will not be shown. -
Virtual Keyboard Choices: Use this configuration to select the preferred virtual keyboard on the device. This setting allows switching between the default AOSP keyboard and the Google Keyboard (Gboard).
Option Description AOSP Keyboard Selects the standard Android Open-Source Project (AOSP) keyboard. Google Keyboard Selects the Google Keyboard (Gboard) when available on the device. -
Copy/Paste: Use this configuration to enable and disable copy/paste functions for texts.
Option Description Enable Allows users to copy and paste content within device fields. Disable Restricts the copy/paste functionality within device fields.
8. Security
-
Show Password: Use this configuration to enable and disable showing password.
Option Description Enable Default setting. Characters entered for password will be briefly visible. Disable Characters entered for password will be always hidden. -
Screen Lock: Use this configuration to enable, disable and select lock type.
The pin option is not compatible with Elo device OS version below 5.000.022.XXX.Option Description None Default setting. Device stays unlocked. Swipe Swipe across the screen to unlock the device. Password Set password that contains 4-16 letters or numbers. - Old Password/Pin: data is required when changing password/pin.
- New Password/Pin: data is required when setting a new or replacing an existing password/pin.
Pin Set pin that contains 4-16 numbers. - Old Password/Pin: data is required when changing password/pin.
- New Password/Pin: data is required when setting a new or replacing an existing password/pin.
-
Enterprise Reset: Use this configuration to enable and disable enterprise resetting the device.
Option Description Enable Disable Default setting. -
Location: Use this configuration to enable and disable location.
Option Description Enable Default setting. Disable Location will be set to inactive. -
Elo Logging: Enable or disable the Elo logging feature in Android Settings.
- Enabling this setting will store fixed-size logs in the device under the "Elo logs" folder of the device. Users can access these logs using the Files program or an alternative file manager program.
-
Auto-Accept USB permission: Enable or Disable auto granting of USB permissions.
- Enabling this setting will automatically grant USB permissions for peripheral devices upon connection, eliminating the need for manual confirmation.
9. Application Management
-
App Permission [Add or Remove]: Select the action to Add or Remove the application from the dropdown menu.
Option Description Add Application This option will add the application provided in the Package Name field. Remove Application This option will remove the application provided in the Package Name field. -
Package names for App Permissions
- Enter the Package Name which needs permissions in the field.
-
Add Package Name and Permissions: Use this configuration to assign specific permissions to an application by defining its package name and required permission.
This setting allows administrators to grant or modify app-level permissions remotely through OEMConfig.
Parameter Description Set Package Name Enter the application package name (for example: com.skype.raider). Set Permission Enter the Android permission to be granted to the application (for example: android.permission.CAMERA). - Notes:
- The package name must match the installed application on the device.
- Permissions must use the full Android permission syntax.
- Multiple package–permission pairs can be added as needed.
10. System Management
- Sticky Boot Mode: Ensures the device retains its selected boot mode across reboots and factory resets. When the "Sticky Elo Boot Mode" option is selected in the Android Settings App, the device will consistently boot into the same mode after both a reboot and a factory reset.